 It truly is reasonably only so i can create strong meals to get Japanese Cream Puff with no need of dedicating an excessive amount of serious amounts of energy. All you need is a little bit practice. Plus soon after tests you may combine components, construct special flavours to be able to tantalize your main essence buds.
It truly is surprising to learn most people just have no idea of that you have a better approach to fat loss versus the old-school bland and boring bodybuilding diet way. There’s a ton of healthy meal options around besides boring chicken, broccoli, and brown rice. This old skool bodybuilding fat loss diet approach is not really necessary or practical. Plus, by eating the same foods every day, you can create nutrient deficiencies because you won’t find the nutrients that you might normally get by using a more balanced diet.
Ingredients of Japanese Cream Puff
Within the baking procedure you might need some important seasonings. In the event that now there are some things that is certainly neglected after that the effect aren’t going to be prior to a person’s expectations. To start, you may create several of the seasonings below.
- You need of Choux (the “dough”).
- Prepare 56 g of Water.
- Prepare 56 g of Milk.
- You require 5 g of Granulated sugar.
- You must have 1 g of Salt.
- Prepare 60 g of Butter.
- It’s 75 g of Flour (preferably cake flour).
- You must have 3 of eggs (at least 125g).
- You need of Custard Cream (filling.
- You require 6 of Egg yolks.
- You must have 96 g of Granulated sugar.
- You must have 30 g of Corn starch.
- It’s 500 g of Milk.
- You must have 50 g of Butter.
- It’s 2 tsp of Vanilla (extract, paste, oil, or bean).
- You need 100 g of Whipping cream.
- Prepare of Garnish/decoration.
- You need of Powdered sugar (optional).
Guidance of Japanese Cream Puff
To obtain fantastic outcomes, please keep to the preparing food instructions along with the subsequent Japanese Cream Puff effectively
- First, we’ll make the custard cream. We’ll have the egg yolks in a medium sized bowl, and the milk in a sauce pan. We’ll split the sugar roughly in half and add it into the yolks and the milk. The milk will be heated on low heat, making sure the sugar dissolves. While the milk is heating up, we’ll mix the other half of the sugar in with the egg yolks until it becomes a little bit whiter..
- When the egg yolks and sugar are whisked nicely, it incorporates air into it, ensuring that it doesn’t thicken when we pour the hot milk into the mixture..
- Now add the cornstarch into the egg yolk mixture. Ensure that the milk doesn’t burn by continually checking and stirring while you whisk the cornstarch into the egg yolks..
- Right before the milk begins to come to a boil, take it off the heat and mix it into the egg mixture gently..
- Now we will return the milk and egg mixture into a pot. When pouring the mixture in, use a sifter to catch any egg remnants or other things that didn’t mix in well..
- Place the pot on low to medium heat, cooking the milk and egg mixture slowly, ensuring that nothing is burning on the bottom. Keep stirring until it becomes thicker. Once the mixture gets thick, take it off the heat and whisk it quickly. Once whisked for a minute or two, return to the heat and cook again but don’t whisk..
- Once shiny, add the butter and the vanilla. If you are using vanilla beans, please add it into to the hot milk mixture first..
- When finished mixing, pour the custard cream into a sheet pan or tray for cooling. Cover with plastic wrap. Immediately place in the fridge to cool..
- Next is the choux. Start by sifting the flour on the side to get rid of any clumps. In a pot on medium heat, mix in the milk, butter, water, salt, and granulated sugar. Make sure it comes to a simmer, mixing everything properly. As soon as the liquid mixture comes close to a boil, turn off the heat, pour in the sifted flour and quickly mix it together..
- Continue to fully incorporate the flour into the mixture, ensuring that there are no clumps. The best way to mix this is by doing cutting motions and folding..
- Once the flour is fully mixed in, we turn the heat back on to low medium heat and cook the clump well by mixing and doing the same cutting movements, folding it repeatedly. You’ll notice that there is a thin layer being formed on the bottom of the pot. Do not scrape that off and try to mix it back in. We actually don’t want this and it is going to help keep the choux mixture clean and smooth..
- Now that it’s cooked through, remove the clump and place in a separate bowl. In here, you want to begin spreading the dough around to let it cool off quicker. Spread it apart and mix it up a few times..
- Mix in the eggs in 3 intervals. After each pour, mix thoroughly. On the last pour, add drops at a time to adjust finely. Keep adding eggs until a triangle peak can form on the spatula after pulling away..
- Place the choux dough in a piping bag with a round piping tip about 1.5 cm in diameter. If you do not have a piping bag, you can just use two spoons. I used spoons! On a sheet pan with parchment paper, make 12 equal sized pieces. Make sure they have enough space in between because they will expand in the oven. Try to replicate a dome shape rather than a frisbee shape..
- If you have eggs left over from mixing into the choux dough, use that to coat the tops of each piece. If you don’t have any more egg, you can simply use water. Use your finger to gently tap and coat the tops and sides. Use your finger to shape the pieces to be more smooth..
- In a preheated 350°F oven, bake the choux for 40 minutes. Once the 40 minutes are over, you can turn the oven off, but keep the pasties in the over for another 10 minutes to sit in the residual heat. Once the 10 minutes are up, remove from the oven to let it sit and cool..
- While they are baking, whip the whipping cream until it forms stiff and strong peaks. Now remove the custard cream that’s been chilling in the fridge. Transfer this into a bowl and mix it up as it should be firm from cooling. When the custard is mixed up and smooth, stir in the whipped cream. You can mix until thoroughly incorporated, or keep it marbled by not mixing it all in..
- Now let’s cut the cream puff with a serrated knife. You want to cut this not in the middle but at a 4:6 ratio. 4 on top and 6 on the bottom. This way, more of the custard cream can be filled on the bottom piece and the top will just act as a hat or lid. Inside, you may find webbing of pastry. You can remove this to hollow out the inside a bit more and make more room for more of the filling..
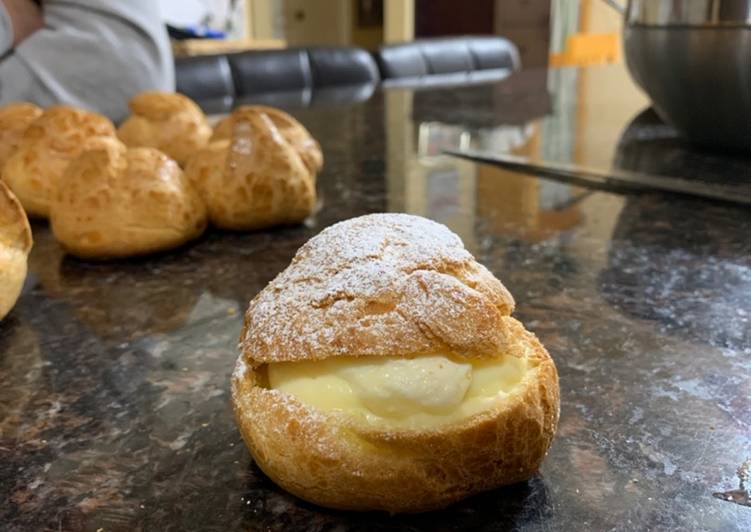
- Now you just fill the pasty with the custard cream using a piping bag or just with a spoon. Once filled, place the top piece back on and you’re done! As an added decoration, sprinkle powdered sugar on top..
- Hope you enjoyed eating your hard work!.
Knowing what and how to cook to impress your in-laws isn’t always easy. The good news is that, as family or future family, they will (hopefully!) be prepared to like you anyway, and they will recognize that you are making an effort and be appreciative of that fact in itself. None the less, it is nice to be able to whip up food that impresses, without too much stress or work.
These days, most married couples start out both having careers. Gone are the days when the young wife has all day to prepare a fancy meal for a special family dinner. So it is particularly important to be cooking something that doesn’t take too long in total cooking time, and also that doesn’t require too many last-minute steps.
One technique that you can employ is to upscale a dish that you can already cook quickly and easily and that turns out well. For example, if you make great spaghetti, meatballs, and pasta sauce, you could aim for a more sophisticated version of the same dish, such as spaghetti, chorizo and pasta sauce topped with sprinkled feta cheese and fresh parsley. There are many variations possible on that one dish, so think how many more you can make on all the other things you already cook!
Another idea is to make something that is considered a fancy dish but in reality is quite foolproof, such as oven-roasted pork tenderloin (although be aware this takes a long time to cook).
Another cooking approach is the make-ahead tactic. If you make a great lasagna or chicken pot pie, these are all things that can be assembled or mostly assembled the night before, leaving you with less stress and more time on the day itself. The make-ahead tactic is also one of the best ways of getting multiple side items on the table in a timely manner.
It is important to take into account the cook time compared with the hands-on time of the dish. For example, roast beef doesn’t take much hands-on time but does take a lot of cooking time, whereas a pasta and chicken dish is the exact opposite. Depending on the other things that are going on that day, you may have a preference for one situation over the other. In designing a menu, remember also to check whether your in-laws have any food allergies or foods they will just not eat.
At all costs avoid meals where most of the cooking is to be at the last minute, such as stir-frying. Anything of that nature will mean that you may become flustered when combining a lot of cooking details with trying to make conversation with your in-laws.
Ultimately, remember that your in-laws are there to spend time with you and your spouse – not to get a five-star meal (there are restaurants for that!) Look at it from the point of view that a few days afterward, people want to remember that they had a good time being together, which actually has a lot more to do with the conversation than the food. In other words, don’t agonize over making the perfect side dish if it means you don’t get to spend as much time with your guests. Making an effort and spending time together, not cooking to perfection, is what counts in cooking to impress your in-laws.
Source : Cookpad